Companies utilize stock options to attract, incentivize, and motivate top talent with competitive financial compensation.
The life cycle of a typical non-qualified stock option has four stages: when the stock option is granted, when it vests, when it’s exercised, and finally when it’s sold.
First, are you adding the stock option through a connection or manual entry?
Connection
By utilizing a connection, the client’s data will feed through, bringing most of the relevant data for the advisor.
Pro-tip: One common best practice for connected stock options is to unlink the account after all the necessary information has been added. From there, you’ll want to double-check the grant information for accuracy and make the necessary changes. Sometimes when the connection refreshes overnight, any manual changes you’ve made will be overridden.
Manual Entry
Make sure that you have all the necessary information available regarding the stock option then go to Advanced Facts > Investments > Stock Options/Grants and Add an Option Plan.
Complete entry of the Basic tab, with special care to entering the Ticker Symbol and Growth Rate.
- Ticker Symbol: The description, asset class, sector and current stock price will populate based on the public trade ticker. The stock price will update based on daily stock market value. If the stock option is not being recognized because it is for a non-publicly traded company, then you can put a placeholder in this section such as “XXX” or “$”.
- Growth Rate: This growth rate applies to the current stock price and what the user wants to show the stock appreciating at over time. This is important for projections of stock options that are selling in the future.
Adding Grants to the Stock Option
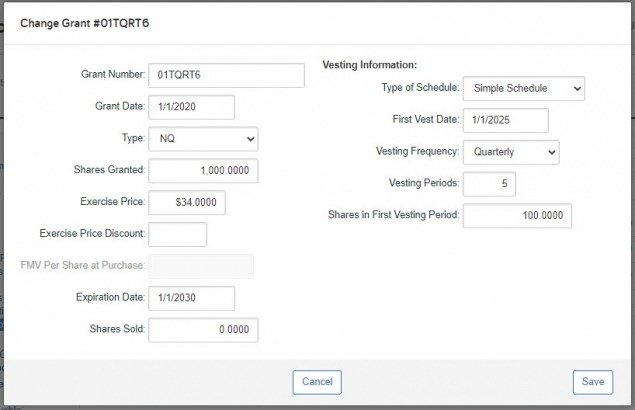
Next, navigate to the Grants tab and Add a Grant. You’ll then be prompted to enter the:
- Grant Date: Represents the date the client was awarded the stock option from their employer.
- Grant Number: The unique identifier for each grant.
- Type: There are two main types of stock options: non-qualified and incentive. You must choose the appropriate type of stock option in order for the system to recognize the correct tax treatment.
- Shares Granted: The number of shares are included in the grant.
- Note: Only whole shares will vest until the last vesting period, when any remainder shares will be vested. Fractional shares accumulate over vesting periods until shares add up to one full share, to be vested in the period where that occurs.
- Exercise Price: The exercise price represents the right to purchase shares of company stock at a stated price, at some point in the future. Keep in mind that non-qualified options have an actual price per share that will be an outflow on the client’s cash flow.
- Note: Restricted Stock Units will always have a exercise price of $0.
- Exercise Price Discount: The percentage to be discounted from the employer stock price when the grant is awarded.
- Fair Market Value (FMV) Per Share at Purchase (Restricted Stock Grants Only): This field will open up if there has been a prior vest date to this year. Enter the stock price for the prior vest date and if there are multiple prior vest dates, this is where the Lots tab (explained below) comes into play. This field establishes the cost basis for the restricted shares so upon sale, the system can calculate the gain (if applicable) correctly.
- Expiration Date: The data at which the client typically must have exercised the shares by, in order for the grant not to become void.
- Shares Sold: Enter the number of shares sold prior to the current plan year.
Next you’ll be asked to enter the Vesting information starting with the Type of Schedule.
For a Simple Schedule you’ll be required to enter:
- First Vest Date: Represents the client’s first ability to exercise/vest a portion or or their whole grant.
- A Non-Qualified Option is the client’s first ability to exercise their shares, but they do not have too. They can defer the exercise until the expiration date if desired.
- Restricted Stock Units vest on this date, so the client would have current value given to them and own the shares outright.
- Once the client has exercised or the shares have been vested, the client can either sell the shares on that same date or continue to hold onto the shares until a future sell date.
- Vesting Frequency: Select the available vesting frequencies (monthly, quarterly, semi-annually, or annually).
- Vesting Periods: The number of vesting periods for the options (enter ‘1’ if all of the options vest at once).
- Shares in First Vesting Period: Use this field if the number of shares in the initial vesting period is different from otherwise consistent vesting across the remaining periods (e.g. “cliff vesting”). For example, if 50% vest in the first year and 25% vest in each of the next two years, enter half of total shares granted here with annual vesting over three years [periods].
If you are unable to recreate the client’s schedule with the Simple Schedule the Free Form Schedule allows you to manually enter vesting dates and share amounts.
Adding Lots to Stock Options
The Lots tab is used for shares that were exercised/vested prior to today and/or potentially sold prior to today. This field is extremely beneficial in ensuring the proper taxation is calculated, remaining shares are accurate, and that proceeds are not potentially being double counted.
Start by selecting the Grant from which the Lot was purchased. Then enter the following information:
- Date Purchased: Enter the date in which the options were exercised. Use a numerical date with a four-digit year (mm/dd/yyyy).
- Note: For restricted shares, enter the vest date. For restricted shares with 83B handling, enter the grant date. For all other options enter the date of exercise. All dates should be in the past only.
- Shares Purchased: Enter the number of options exercised and employer stock purchased.
- Note: For restricted shares, enter the amount of shares that have vested.
- FMV Per Share at Purchase: Enter the fair market value of the employer stock purchased.
- Note: This amount must be greater than the exercise price of the stock options. For restricted shares, enter the FMV of the shares at vest.
- Sold?: Select Yes or No from the drop-down box to indicate whether or not a sale occurred.
- If Yes the following fields will be unlocked:
- Sale Price: Enter the sale price of the employer stock sold.
- Date Sold: Enter the date on which the employer stock was sold. Use a numerical date with a four-digit year (mm/dd/yyyy).
Completing the Strategy Tab
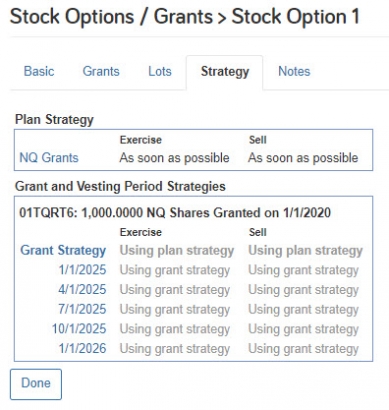
The Strategy tab is for designating the client’s future stock option activity, such as when will the client exercise or sell the shares.
The Plan Strategy can be thought of as the overall master strategy that you have for your underlying grants. If all your underlying grants say “Using plan strategy” then it is enabled. In this example, all the grants are utilizing the Plan Strategy.
Note: If the sell column displays “All shares have been sold” the grant is completely sold prior to today and will not affect the client’s situation moving forward.
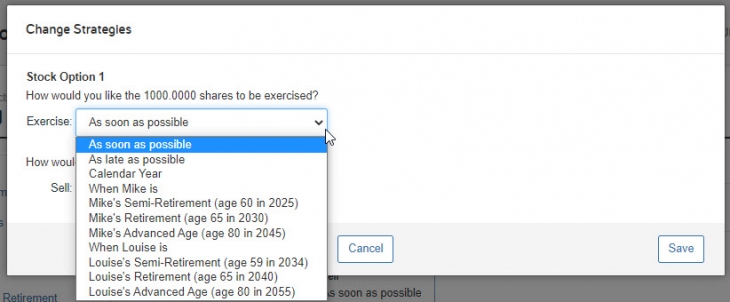
The system will default the exercise and/or sell to “as soon as possible” when first adding stock options. If the user would like to change any of the strategies you can click into the Plan Strategy, Grant Strategy, or select an Individual Vesting Period to adjust the exercise and sell strategy.
Once you’ve entered all the necessary information for your stock option on the Basic, Grants, Lots, and Strategy tabs you’re done!
Looking for more information about Stock Options? Log into eMoney and go to the Knowledge Base under Help and search stock options for FAQs, videos, and user guides.


